• Blog
  • A La Carte
  • Archives
  • About Me
Menu

The Hungry Scribbler

  • Blog
  • A La Carte
  • Archives
  • About Me

Coconut-Braised Greens

August 24, 2017

Several weeks ago, I was walking with our Friday group just past the great blue heron rookery near the bay. We stopped and like the others, I tilted my head, listening to the loud, prehistoric-sounding caws. Standing still, I pictured winged teradactyls and quetzoquoatluses hidden in the dark leaves. I peered up at the trees, binocular-less, searching for the enormous nests which I soon discovered were a good four feet across.

Then, we watched, mouths agape as one or two of the herons started with barely a rustle, and soared swiftly away, easily reaching the full six-feet of their wingspans, the great creatures gliding and circling with little apparent effort. 

I straggled behind a bit with Christine, who walked alongside her own human hatchling. Meira, wearing an adorable bonnet, was just over a year and was now walking with what seemed a lot of confidence for such a tiny person.

I said to Christine, "She's becoming who she is." 

Christine smiled and answered, "I feel like I'm still becoming who I am."

I held onto this as I continued on. I realized that Christine was right: we can always keep changing and becoming who we are no matter how old we are or where we are in our lives. It doesn't matter whether we are moving through life's swift currents or standing with heels dug in, watching the herons.

I suppose that's the crux of it then, the reason why I haven't been around here in a while. I've been busy exploring, discovering, protecting the little hatchling inside myself that's trying to grow into something different from what, or who, already existed. I'm becoming who I am.

It hasn't been an easy process, and I suspect it's not over yet. That's a good thing, I think. Maybe at some point, without even realizing it, I'll be ready to fly.

Well. Here are some of the things in the past few months that I've worked on (and am still working on!):

1. Came back from the Josey Baker workshop in March and proceeded to tweak the same bread formula (Josey's Country Loaf) using locally grown and milled wheat. Felt like I should be wearing a white lab coat with all the detailed notes I was taking. Some days resulted in disastrously dense loaves, but I soldiered on. Told myself over and over again to go back and start from what did work. Did this every, single day for eight weeks straight until one day, my bread snob friend, Sabine, took a bite and told me I had "hit the nail on the head." (Yes!)

2. Volunteered to help my race-director husband make post-race food for the Lake Whatcom Triathlon, somehow using the bread I had mastered.

This resulted in me baking thirty loaves of hearth bread (in my home oven) and then turning it all into enough grilled cheese sandwiches to feed every athlete, volunteer, timing person, police and sheriff officer, as well as random people coming through. So basically, almost 300 people within a two-and-a-half hour time frame.

And guess what? The race was awesome, no one got injured, and everyone seemed perfectly happy to devour the crisp-crunchy, toasty-gooey sandwiches I'd made. Thankfully, I had some lovely volunteers -- Joanne, Marrielle and Alexandria. 

3. All of which brings me to "Grilled Cheese For My Friends," which is what I called the whole experimental grilled cheese extravaganza that day. I even made a banner for it. Maybe it was because of the banner, but people started coming up and asking me if I had a food truck. Nope, but if you want me to come to your house and make 300 grilled cheese sandwiches, I'd be happy to do it for ya. 

3. Started selling selling loaves to friends, families and neighbors who seemed to feel guilty (I think?) for constantly getting free bread because I was baking so much. This lead me to start calling my "neighborhood micro-bakery" Bread Skool. If you're in the area and want to buy bread, shoot me an email. The Bread Skool website is coming soon too and you'll be able to order bread from there.

4. Speaking of Bread Skool, I also started working toward making my goal of teaching baking and cooking classes (especially to young kids) a reality. At first, this involved my creating a little curriculum and teaching the sourdough process to friends. Then, I got connected with the Play Lab here in town and will be teaching some parent-child classes for kids three to five years. Yes! Starts next month with Flatbread classes and a stand-along Hand-Rolled Couscous class. They're called "Little Hands" classes and you can register by clicking here!

And well, there's more, but you get the gist. It's been on the busy side. There hasn't been a lot of time to test and put together many recipes or shoot photos. In fact, meals around here have been a bit on the unorganized side of things. 

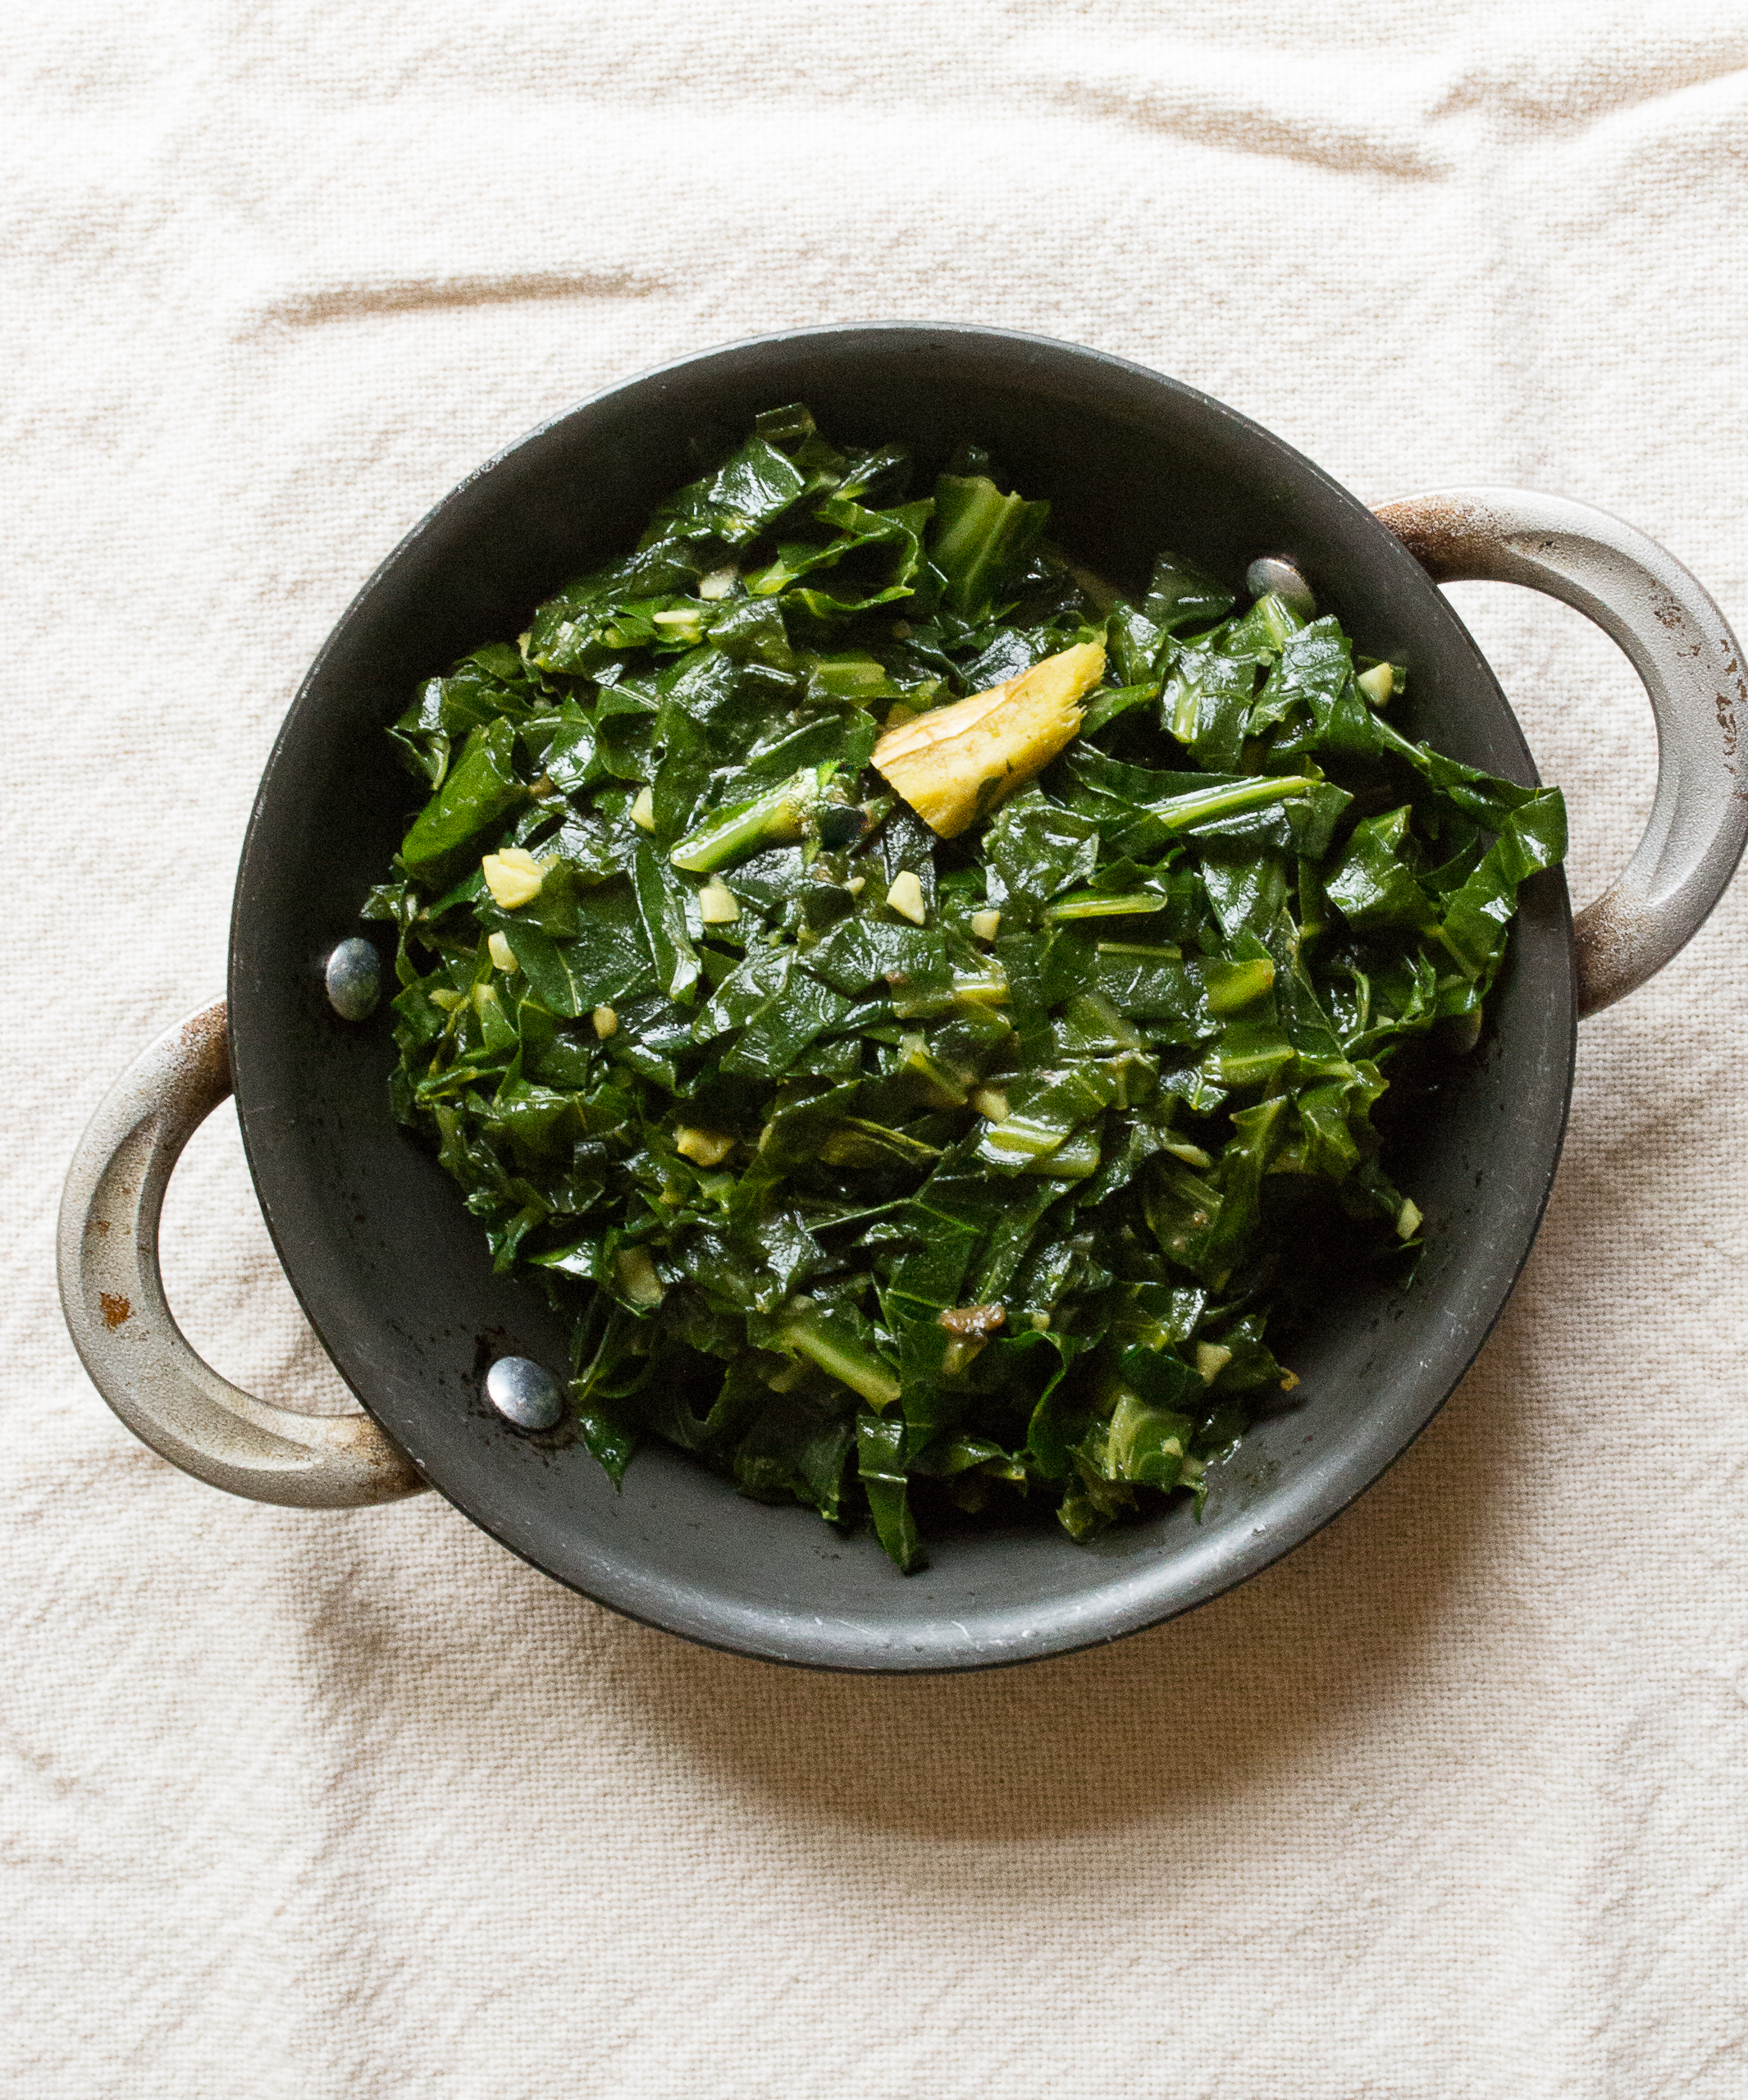
Which brings me to this very flexible dish of coconut-braised greens. If you've got some greens around, a little bit of mild curry powder and some coconut milk or cream, you can make this very quickly -- even if you've got a ton of things going on. It's full of flavor and is so comforting. To me, it feels like a hug, especially when you're drivin' through Busy Town.

Coconut-Braised Greens

Serves 1-2. Great with a couple of pieces of good bread, toasted and well-buttered.

Ingredients
1 bunch of greens (collard, kale, etc.)
1 tablespoon coconut oil
1-inch peeled, fresh ginger
1 garlic clove, minced
1 1/2 teaspoon mild curry powder (plus more, if you want a stronger curry flavor)
1/3 to 1/2 cup coconut milk or cream, plus more as needed
Salt, to taste
A couple of squeezes of fresh lime juice

Instructions
Remove tough ribs from leaves. Roll up leaves and chop thinly. With side of a large knife, smash the ginger then mince. 

Heat oil in large, heavy-bottomed skillet over medium-high heat. When pan is hot, add ginger and saute for 1-2 minutes, until fragrant. Add garlic, give a stir, add curry powder and a generous pinch of salt. Stir in greens. Saute until greens begin to turn a bright green.

Add coconut milk/cream. Stir, then cover. Reduce heat to low and cook for about 12 minutes. Uncover and check. If the mixture seems dry, add more coconut milk/cream. You don't want it at all soupy, just moist enough so that the greens are not sticking to the pan and can move around easily. Cover again and cook for an addition 10-12 minutes (depends how soft you like it). When cooked to your liking, add lime juice and adjust salt to taste. Stand at the stove and eat it straight from the pan or if you are sharing, divide it into two small bowls. Devour immediately.

In Asian Tags coconut-braised greens
Comment

Baking with Josey Baker!

March 28, 2017

I closed my eyes and stood listening to the rough, rhythmic sound of two dozen hearth loaves being shifted from one part of the Miwe triple-deck oven to another. It was surprisingly soothing, calmness in the middle of the excitement palpable in the room.

Our breads were baking! They were beautiful, and smelled so good, deep and golden as the sunlight I was wishing for on this damp Washington day.

A group of us stood close by, watching as Josey Baker (yes, real name!), stabbed a wide, wooden peel into the oven, pulling out our loaves/babies, checking them for color before pushing them in again. The back of the oven was much hotter and Josey was moving loaves around so they would bake evenly. Josey prefers a bold bake, so he was working on getting them to burnished but not too much so.

This was our second day at the new King Arthur Flour Baking School, where Josey was teaching us how to build and bake the types of hearth and pan loaves he sells at his bakery, The Mill, in San Francisco.

The baking school is located within The Bread Lab, in Burlington, Washington, not too far from my town of Bellingham. If you don't know about it, well then, you should get yourself acquainted. Here's a good place to start, or watch Bread Lab Director and wheat breeder, Dr. Stephen S. Jones, as he talks about flour here.

Dr. Jones visited during our second day and walked us over to the test kitchen, where we yes, talked flour, and got to see all kinds of milling equipment, from a German Mock Mill you can attach to your KitchenAid mixer to a large wooden beauty of a stone mill called an Osstiroler from Austria.

Then there was the equipment they use to test the different qualities of flour, such as for gluten strength as well as starch and protein levels. Wow. I was starting to feel like a little kid; I was jumping up and down inside.

Thing is, being a home baker, I don't get many opportunities to talk to people in my daily life about protein content, oxidation and milling practices without them glazing over (or actually nodding off, yep), so this was it. I finally felt like I was with my people.

After this, we also got the chance to visit the new stone mill that is being built around the corner, in conjunction with Camas Country Mill , the Port of Skagit and Patagonia. From the outside, a non-descript warehouse building greeted us, but once inside, a beast of a mill, with parts from Denmark, Ethiopia and Kansas sat impressively before us.

Here's Tom Hunton, farmer and owner of Camas Country Mill, who was there talking to us about the new mill, the disappearance of regional mills throughout the country, farming and milling practices, and his desire to sustainably feed his community.

Knowing about the flour you use as a baker is so crucial, but isn't necessarily something the typical home baker thinks about. But we should! Who grew the grain where and using what practices? Was it sprayed with Round Up before harvest? How was the grain milled? And wait, back up, is it a genetically modified variety? Surely these are questions worth asking if you want to make bread that feeds and nurtures on all levels. 

But back to the actual bread making. We made three with Josey: his Country Bread, Red White and Rye, and his Dark Mountain Rye, a 100% rye loaf crammed with rich, toasty seeds. Because I haven't baked much with rye, which he assured us has a much smaller margin for error than wheat, it was especially helpful to learn Josey's process.

Rye dough looks like cement! Especially when you make 24 kilos of it, like Josey did! Take a look:

Because rye is very low in gluten, a 100% rye dough lacks structure and needs to be baked in a greased pan, unlike the wheat doughs, which we shaped, proofed in bannetons and baked directly on the oven hearth.

The combination of actual hands-on practice and learning principles, as well as the information about flour and milling practices, was just right for me at this point in my bread baking journey. It was also a huge treat to visit the new mill, see the test kitchen, and hear Dr. Cole and Tom Sutton speak.

One of the most helpful things Josey taught us was how to pre-shape and shape the dough. After dividing it once the bulk fermentation is complete (I'll go over this in a future post), he tucks the bench knife under the piece of dough, metal edge facing away. Then he simply pushes the bench knife (and thus the dough) in a J-shape ("J like Josey!" he said), flicking it away from the dough at the end of the movement.

As if by magic, the once globby piece of dough suddenly looks taller and slightly rounded. A few more times of this, and the dough has real shape, all without any manhandling. Genius!

I'm incorporating everything I learned as well as using the rye starter I got from Josey into my bread baking here at home. A big thanks to Josey Baker, who is a kind, generous, and totally cool teacher! You're the best!  

In Breads Tags Sourdough Bread
4 Comments

Spelt Tortillas and Using Your Hands

March 8, 2017

Late winter, nearly spring now. My hands are chapped as rough-hewn wood and my fingertips still don't want to be anywhere but snuggled inside a pair of wool mittens. 

Hands are our best tools, and tools are meant to be used. Hence, the current sad state of my palms and fingertips. Yet, it seems to me that most of us take our hands for granted. When, afterall, was the last time you actually said thank you to your hands?

Like, maybe never?

I know! I just realized this!

Some of you might find this weird or dorky, but since they work so hard, I think we ought to give our hands a shout out once in a while. Show our gratitute for all the little things they allow us to do every day.  

So, today I'm saying out loud, "Thanks hands! Thanks for letting me type this blog post! Thank you for holding my fork up so I could eat my lunch. Oh, and thanks for being there even before that when I was desperate to put that coffee mug to my mouth. Also, you totally deserve that cute, hands-together-gratitude-emoji! You're the best!"

I could go on, but you can see what I'm getting at. 

Yes, gratitude to the hands. No, not silly. Not at all.

Speak it; yell it into the wind. Then go and use them, the best tools you will ever have, to pat some pillowy dough into tortillas that cook up chewy-soft and perfect for tacos or quesadillas. 

Thank you hands!

Spelt Tortillas
Kingston and I made a batch of these the other day and filled them with a mixture of chorizo, potatoes and onions. But they are also delicious simply slathered with good butter, fresh off the skillet. If you're feeling like veggies, some sauteed greens and caramelized onions would be nice. We decided that these tortillas are our hands-down favorite, of all the versions we've made so far. 

Adapted from Serious Eats. Makes 8 8-inch tortillas.

Ingredients
200g (1 2/3 cups) all-purpose flour
100g (2/3 cup plus 1 tablespoon) whole spelt flour
1 1/2 teaspoons baking powder
1 1/2 teaspoons kosher salt
36 g coconut oil
174 g (3/4 cup) warm water

Instructions
In a medium bowl whisk together flours, baking powder and kosher salt. Work coconut oil in with your finger tips to form a crumbly mixture. Add water, combining with your hands until everything comes together into a soft dough and no dry flour is left in the bowl. Cover dough with a dampened kitchen towel. Rest the dough for 10 minutes.

On a lightly floured counter, divide dough into 8 pieces. Cover with a damp towel and rest the dough for another 15 minutes. 

Pat out each piece of divided dough into a flat disk. Roll out into an 8-inch round, dusting very lightly with flour as needed. 

Preheat a seasoned, cast-iron skillet (I used my 10-inch one) on the stove or in the oven until it reaches 500°F. Basically, you want the skillet piping hot. If you have an infrared thermometer like I do, now would be a good time to point that thing straight at the bottom of the pan for a temperature check. 

Ease the dough into the ungreased, hot skillet and cook for 45 seconds to one minute, until bubbles form on top and the bottom starts to blister. Flip and cook for an additional 45 seconds to one minute. Remove from skillet and place in a kitchen towel, covering to keep the tortilla warm. Repeat until you've finished cooking all the dough.

Eat warm, filled with goodies of your choice, or simply buttered. 

In Baked Goods, Breads Tags Spelt Tortillas
2 Comments

Winter Activities and Nigel Slater's Sticky Malt Loaf

January 12, 2017

The New Year is off and I've been hurrying behind it outside in the freezing cold before slowing down again inside our toasty warm house, literally making piles of toast in the new doodad that my brother, Warren, sent over the holidays because he felt sorry for me having a fourteen-year-old toaster that only half worked.

Thank you, Warren.

We've been able to make lots of toast around here because I've been obsessively baking up all sorts of bread. There's Peter Reinhardt's Lean Bread, with its blistered, golden crust, which we now refer to as Crack Bread because once you start, you can't stop eating it.

Then, there are Sarah Owen's gorgeous breads, like Butternut Squash and Cherry from her beautiful book, Sourdough. With its golden crumb and easygoing sweetness, this is one of the most reassuring breads you can eat on a frigid winter's day. I can't leave out Ken Forkish's Bacon Bread (yes!), though, or his Field Blend #2 (whole wheat, dark rye), one of my very favorites. 

Gluten-free friends, wait. 

I've been working on my skills there too. What a challenge! I'm still chugging along with this even after Kingston made awful faces the other day while trying to eat some sorghum and brown rice soft pretzels I baked. Soft, they definitely were not. (There were, in fact, some jokes made about chucking them into the pond and hurting a duck. Nick Hornby fans out there, you know what I'm talking about.) And okay, I'll admit here that I made some faces too. Horrible ones. 

“What’s that floating next to it?” Will asked. “Is that the bread you threw at it?”

Marcus nodded unhappily.

”That’s not a sandwich, that’s a bloody french loaf. No wonder it keeled over. That would’ve killed me.”
— Nick Hornby, About a Boy

Though I've been making a variety of breads, I've mostly been using my trusty liquid levain, or starter. It has become, over time, practically invincible, doing its job with a consistency and joy that we should all strive toward if we want to feel truly alive. Because, what is the point of doing anything unless we put our full energy and conviction behind it? Do it like you mean it, I say. And, so what if I happened to learn this this from a goopy mass of wild yeast and bacteria?

We've also been ice skating a lot lately. Until this winter, I'd pretty much forgotten about it as an activity. It was one of those things I did every now and then as a kid at Pickwick Bowl in sunny Burbank, California.

Then a few weeks ago, some parents at school mentioned ice skating, an outing was organized, and there I suddenly was mincing about the rink, a bunch of little humans circling me. I watched as they took turns falling with a splat -- here, there, everywhere -- before getting up and continuing on again. Such little heroes.

Kingston and I have been back on the ice many times since then. This makes a lot of sense because one of the best ways to feel like a kid again, full of motion, freedom and complete joy, is to put on a pair of ice skates and go! Do some backward swizzles while you're at it.

In the meantime, if things get hard, as can happen in skating and in life, then, whether you're wearing skates or not, it's best to do what Kingston's teenage skating teacher suggests.

Here it is: When you think you're going to fall, slow down, put your hands on your knees and stop. When you are ready, stand up straight and feel the strength in your legs and your body. Start again. Go.

I'll add that when you're done at the rink and back at home, you should promptly toast up a piece of Nigel Slater's sticky malt bread, which I'm sure you'll have wisely baked ahead of time. Put that toasty goodness to your mouth. Devour it. Then feel it warm your belly.

NIgel Slater's Sticky Malt Loaf

This bread is best after aging for at least two days. It just keeps getting better and is completely worth the wait, so stay disciplined. Don't cut into it! Around here, we like this well-toasted. What happens is that the sugars from the fruit, molasses and malt extract start to caramelize and you end up with a toasty-roasty piece of bread that is at once sticky and chewy, melty and crusty. One more note: I used liquid malt extract from our local brew store, which sells it in bulk. Malt extract is a grain-based sweetener, usually made of barley. The grains are processed with water and the starches removed to create a liquid sweetener. I had a pile of it left over after making Renee's Rye Bread from the third Tartine book and decided to use some for this. 

Mr. Slater's recipe, translated for the American masses. Makes one loaf.

Ingredients

2/3 cup liquid malt extract (150g)
1/4 cup light brown sugar, tightly packed (100g)
2 tbsp unsulphured molasses
1 cup, plus 5 teaspoons all-purpose flour (250g)
1 teaspoon baking powder
1/4 teaspoon kosher salt
1/4 cup prunes, pitted and roughly chopped (100g)
2 large eggs
1/2 cup black tea, lukewarm to room temperature (125ml)
1/4 cup golden or Thompson raisins (100g)

To finish:
A teaspoon or so more malt extract

Instructions
Line a large loaf pan with parchment paper. Preheat oven to 325°F. 

In a small saucepan, combine the malt extract, light brown sugar and molasses. Without stirring, warm mixture over a moderate heat until the sugar has dissolved.

In a large mixing bowl, thoroughly combine the flour, baking powder and salt.  

Pour the warm malt and sugar mixture into the flour, together with the tea. Break the eggs into a small bowl, beat lightly with a fork and fold into the batter with the chopped prunes and the raisins.
Scoop the soft mixture into the prepared pan and gently smooth the surface. Bake for 1 hour until lightly springy, then remove from the oven and leave to cool in the tin. While the cake cools, brush the surface with a little more malt extract. After it cools, wrap well. Now wait a day or two, if you can, before eating!

In Baked Goods, Breads Tags Sticky Malt Bread
1 Comment

My Favorite Black Bean Soup

November 30, 2016

And with a suddenness that has once again caught me off guard, the darkest time of year is here.

Meanwhile, our family has been furiously celebrating the light within, mostly through festivals at Kingston's school. Michaelmas, to remember our courage when we are faced with dark times; Martinmas (and its corresponding Lantern Walk), to make external our inner light, our lanterns guiding us in the darkness.

These activities were designed to remind us -- children and grown ups both - that though we may be faced with the unknown, we have the ability to summon strength and courage, light and goodness from inside ourselves. These festivals help us to remember again and again that light and dark each have their time as they move through the seasons, like the earth breathing in before exhaling again.

This has been good for me to remember, especially in the past several weeks. Since the night of November 8th, I've been mucking through, trying to sort out my feelings about our general collective state. I've been doing this, like more than half of the people in this country, because the candidate I threw in with did not win.

We are joined together in whatever happens next, no doubt about that. This makes it more important than ever for us to connect with those around us through conversation and shared experiences, good food and open minds.

Neighbors, friends, acquaintances and family. It doesn't take much. Invite them in for soup. Let it soothe us as we take comfort in one another's company. Together, we are resilient.

Comforting Black Bean Soup
This is the soup I could eat every day, rain or shine, whether I'm feeling happy, sad or worried about nothing and everything. It is extremely simple and requires pretty much no attention once you have thrown all the ingredients in the pot. If you want to make this vegan, simply omit the pork and throw in a piece of kombu to add that extra umami flavor that the pork otherwise gives this.

Adapted from The Kitchn.

Serves 4-6.

Ingredients
1 lb. dried black beans
2 medium red onions, finely chopped
1 red peppers, finely chopped
5 garlic cloves, finely chopped
3-4 slices thick-cut bacon (or substitute 1 large piece of kombu)
1/2 cup extra-virgin olive oil
2 teaspoons salt
Black pepper
1/3 cup apple cider vinegar

Garnishes
Chopped cilantro
Chopped jalapeno
Chopped onion or scallion
Sour cream or grated cheese
Hot sauce (such as Tapatio or Cholula)

Instructions
Pick through beans, removing any stones or debris. In a large container, cover beans with a good 2 to 3 inches of water. Allow to soak overnight.

The following day, drain beans. Place in a large pot. Cover with about an inch of filtered water. Add onions, peppers, garlic, bacon, oil, salt and a generous amount of black pepper. Over high heat, bring the pot to boil then turn down to low simmer. Allow to simmer covered for 3 1/2 to 4 hours. At this point, the beans will be quite soft. Use a potato masher to gently press down on the beans. This will break down some of the beans while leaving some texture. If you are using kombu, the seaweed will have melted into your soup by this point. Continue to simmer 15 to 20 minutes then add vinegar. Cook an additional 15 minutes to mellow out the vinegar. Serve with garnishes and a dash of Mexican-style hot sauce if desired. This is great with cornbread.

The soup keeps for several days and continues to improve in flavor, as bean dishes often do. It will thicken up after refrigeration. Sometimes I add a little water when I warm it up, other times I eat it as is, thick and creamy.

In Comfort Food, Comfort Foods, Soup, Soups and Stews Tags Favorite Black Bean Soup
2 Comments
Older Posts →
Change is in the air/hair. #haircut #newhair #goldcombsalon #pnwfall
When’s the last time you saw a 5-day old baby donkey? We saw this one today. He stopped to say hi to us after nuzzling his sweet mama. #cutenessoverload #donkey #farmlife #pnw
New bread board, close up. My goodness, what an amazing Mother's Day present! It's a single piece of maple 2 1/2 x 4 feet with gorgeous spalting. Mark the woodworker at Hardwood to Get here in town spiffed it all up for me. Happy Mother's Day to all
So here's my question. If it's a double rainbow does that mean there are two pots of gold? #rainbow #pnw #pnwspring
This book! Ugh, just glorious. My brother keeps those Amazon warehouse robots busy by sending me amazing books he thinks I should read. Everyone needs a brother like him. #emilferris #readingbingetonight #myfavoritethingismonsters #graphicnovel
Bold bake for breakfast today. It's the rye-wheat from @blainewetzel 's beautiful Sea and Smoke. I love how this book highlights so many special plants and ingredients we have in this area, including those right here across the bay from alumni. #rye
From the weekend Easter Egg Hunt. While all the kids and competitive kids-at-heart were running through the woods looking for eggs, I was on the forest floor snipping nettles and fiddleheads. Priorities, you know? I managed to leave the hunt with one
Ssh! Don't tell. We went off the trail! But then we found salamander eggs, tree frogs and touched our fingers to a cascade of sap flowing down the side of a Douglas Fir tree. Spring means the woods are noisy and so alive. #exploringnature #nature #wo
So I was minding my own business, trying to get a #crumbshot of the Country Loaf I made during @matts_miche 'a awesome bakealong, when someone's paper airplane landed exactly on top of my loaf. #photobombed #bread #bread🍞#naturallyleavened #sourdoug
“It is impossible not to love someone who makes toast for you. People’s failings, even major ones such as when they make you wear short trousers to school, fall into insignificance as your teeth break through the rough, toasted crust and sink into the doughy cushion of white bread underneath. Once the warm, salty butter has hit your tongue, you are smitten. Putty in their hands.”
— Nigel Slater

Still Hungry?
Enter your email address:

Powered by Squarespace